Cape Dory Typhoon, Weekender

Cape Dory Typhoon, Weekender

Monday, July 13, 2015

Reinstallation of the Foredeck Cleat & Patching / Fairing Work

July 13, 2015

Working for an hour and a half in the evening, I was able to begin work on the foredeck cleat.  The process here would be to overdrive the old fastener holes, fill with thickened epoxy(cabosil / colloidal silica), pre-drill a pilot hole, and then tap for new silicon bronze machine screws.  It was happy that I decided to remove the foredeck cleat and properly install this deck fitting.  Using a 3/4" forstner bit I drilled through the top skin, through the coring, and then into some sort of thickened polyester fill.  Once I made it through the top skin, I immediately noticed a discoloration in the coring and some deterioration of the core in the port-forward hole.


I thoroughly inspected the new oversized holes, and made one additional "inquiry" behind the port-forward hole due to the condition of the core.  I was happy to see that the moisture damage was isolated to a roughly 1/2" to 3/4" diameter around the old fastener holes.  Wetting out the core with epoxy and then filling with the structural mixture will take care of the slight deterioration in the port-forward hole as well as the others.


I finished by sanding around the work area to prepare for filling and fairing.


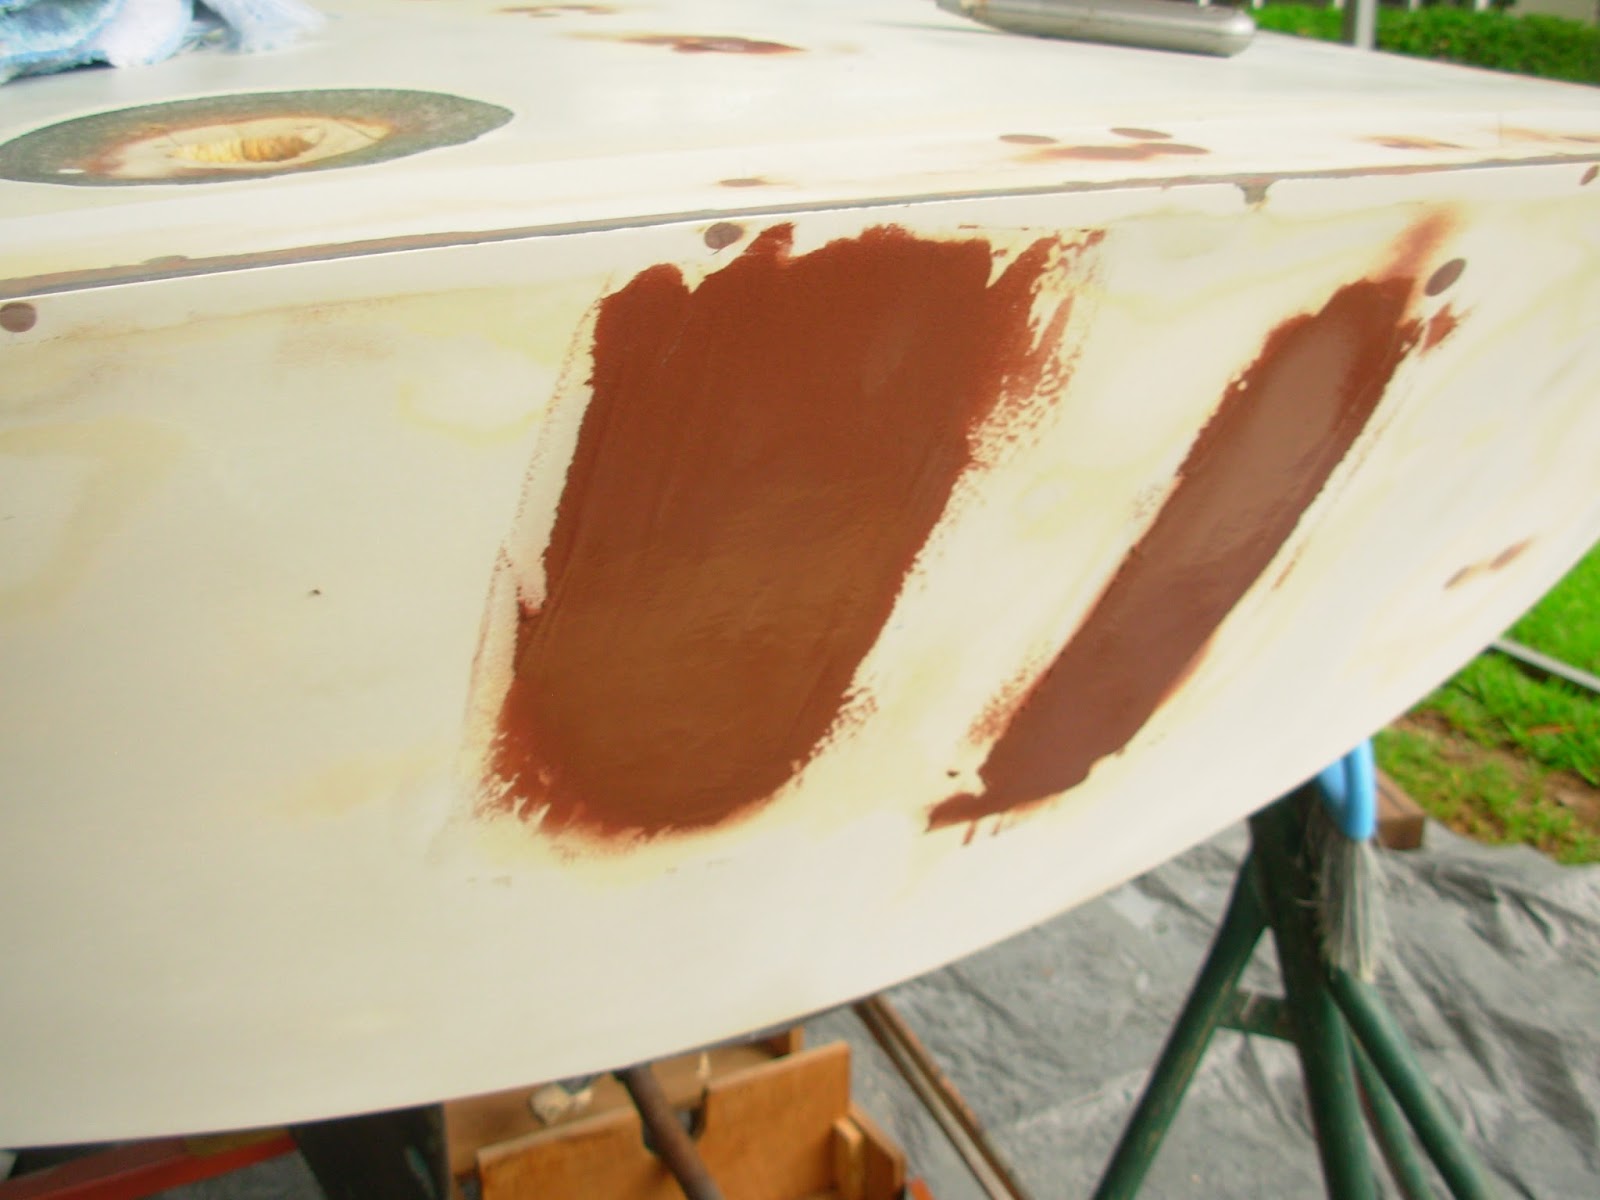
 Next on the to-do list was to water wash the previous day's patching and fairing work, sand the work surfaces, clean the surfaces with solvent and generally prepare for more filling.  I was happy to have finally completed fairing the surfaces around where the old motor bracket was installed.  What was left to work on was the old stern light and the haws pipe deck fitting.  I mixed up some epoxy and thickened it with micro balloons.  Using a 6" knife, I spread a thin layer over the recent patch on the deck surface where the haws pipe was installed.  The last application of fairing compound nearly brought the surface to fair, so this should be the last application. 


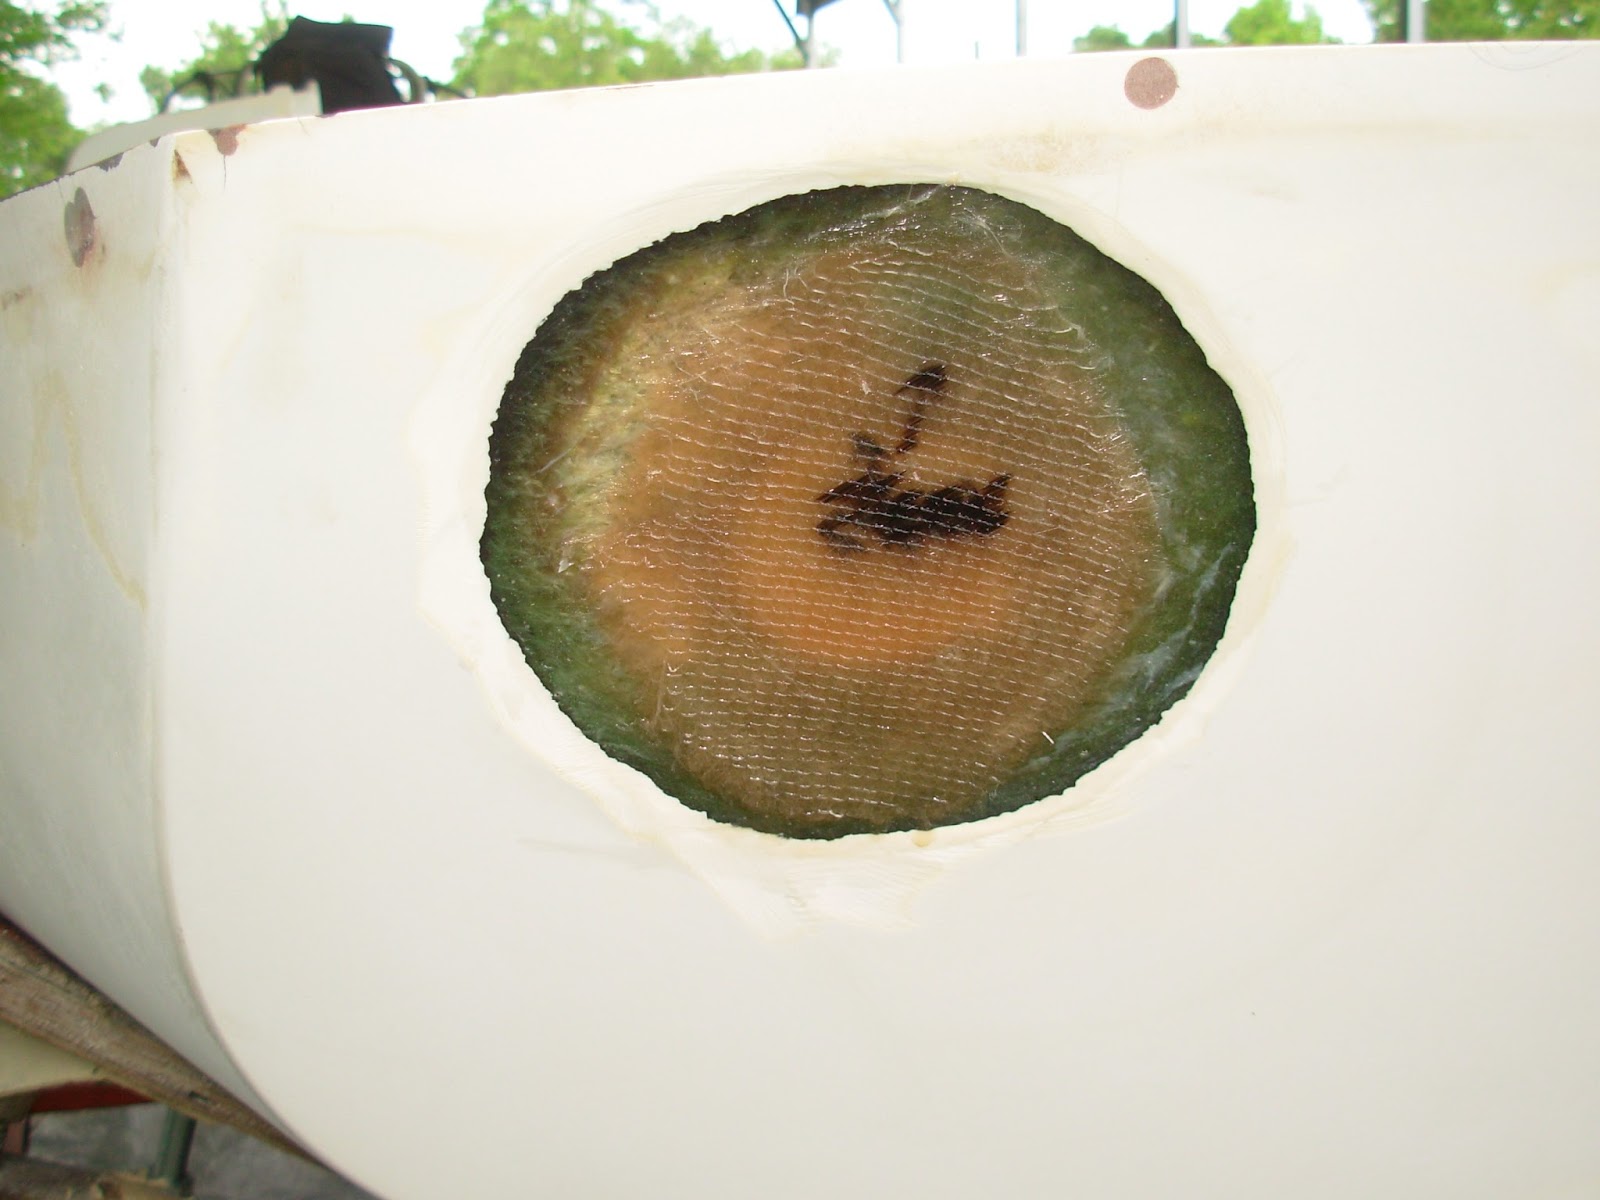
I applied a piece of plastic over the stern light patch and traced for a couple patterns for the 1708 biaxial - this dished out area went a little deeper than I had intended, and I was creeping up to just beneath the gelcoat surface with additional patches so that I could complete the work with an application or two of fairing compound. 


Running my hand across recent work, I did notice an area that needed a bit more fairing compound - the starboard quarter of the transom where a small stainless steel bracket was fitted.


Total Time: 1.5 Hrs.


Sunday, July 12, 2015

Continued Patching & Fairing

July 12, 2015

Sunday was an easy day for boat work - managing to get around to doing some work on Alva Anne by late afternoon.  The focus today was the patching on the poop deck and transom, and spot filling.  I began by water washing the previous day's epoxy work, and then sanding those areas to ensure a fair surface.  The obvious spots that needed further attention was the patch work on the poop deck and transom - these were holes for the former haws pipe and the stern light.


The former haws pipe hole on the poop deck was brought close to the level of the existing gelcoat, and need only fairing compound.


The former stern light hole, once patched, needed a bit more work to bring closer to the adjacent gelcoat surface.  My approach here was to apply a couple more layers of 1708 biaxial cloth, and then fill with fairing compound.


I again made a couple of patterns of ~3/4 circles to further fill the transom patch.  I transferred these patterns to 1708 biaxial cloth, and then prepared a small batch of epoxy. 


With rain approaching quickly, I went straight to work by properly saturating the cloth and then laying the two pieces of cloth into place.  with rain shrinking over my shoulder, I went ahead and applied a small protective sheet of plastic.


In the same moment, I also mixed a small batch of epoxy thickened with micro balloons and spread this out over the transom where the motor bracket was formerly affixed.  This areas was on its third round of filling-fairing, and hopefully this would be the last.  I also applied the fairing compound to the poop deck patch, and quickly covered with plastic sheeting to protect from the rain showers - sorry, no picture of the deck work.


With the primary goal accomplished for this easy day, I set out to reconnoiter the bottom of Alva Anne.  There are quite a few small blisters across the bottom.  I noticed these the day she came out of the water in Oriental, NC - I took 20 minutes on that day to pop as many as I could.  Today, I took the  Porter Cable 7335 and a 6" 40-grit pad, and proceeded to survey the surfaces below the anti-fouling paint.  For the most part the bottom is in good condition, despite the sporadic blistering.  My initial thought after I worked this small area is to sand the bottom to remove any poorly adhered paint, dish out, fill and fair the blisters, wipe clean with a solvent, apply Interprotect 2000E, and finish with a hot-coating of ablative bottom paint. Some research is required first, but I like this approach.  


I also wanted to take a look behind the structural panel (port and starboard).  I had a suspicion that access to the chainplate bolts lay behind this panel.


I removed the 13 screws and gently pried the panel from its placement.


Sure enough, just through the 6" circular access hole I spied the chainplate bolts - without a backing plate.  I will be replacing these while the boat is being refitted.


Total Time: 3 Hrs.

Saturday, July 11, 2015

Patching, Filling & Fairing

July 11, 2015

The goal for the day was to water wash the previous application of fairing filler and sand to fair, spot fill and areas needing further attention, and patch the hole that was the former haws pipe on the poop deck and the hole that was the stern light. So to it...

I began by making my way around the boat with a Scotch-brite pad, a spray bottle filled with water and a towel.  I spritzed the previous fill areas, now cured, scrubbed with the Scotch-brite pad, and towel dried to prepare for sanding.


Using 80-grit pads and the Porter Cable 5" random orbital sander, I made my way around the boat sanding the previously filled areas to fair.  I noticed a few areas on the boat that needed yet another fill application, the stern being the primary place requiring further attention.


The motor bracket mounted on the stern was backed by aluminum plates; nevertheless, it still managed to "warp" the stern where the bolts passed through the transom.  The first couple of rounds of filler brought the surfaces nearly fair, a but third application was required.  Mixing a batch of epoxy, I thickened with micro balloons and used a squeegee to fill in the low spots.  This should hopefully be the final fill.


In addition to the stern fill work, I filled a few areas along the sheer line that needed a bit more.  That complete, I turned my attention to the day's primary work: patching the holes holding the haws pipe and the stern light.  Using a grinder outfitted with a 40-grit flap wheel disc, I ground a gentle taper around the holes.  These tapered grinds would be filled and patched with at least two 1708 biaxial patches, and the filled and brought to fair with the adjacent surface. 


Before applying the patches, I need to create a "backing" for the filler and patches to adhere to - creating a structurally sound patch.  I used a rough 6" x 6" square of 1708 biaxial, fully wetted with epoxy, resting on a sheet of plastic, and adhered both the fiberglass and the plastic to the underside of the poop deck.  Before applying the fiberglass backings, I sanded the underside of the poop deck with a pass of the Porter Cable and a 40-grit pad, and then cleaned the surfaces well with acetone.  


After applying the backing to both holes, I took on other duties to allow sufficient time for the epoxy backing to tack up.  I turned to sanding the companionway hate, and worked the surfaces with 80-grit paper with the 5" sander and by hand, as was required in the tight corners and transitions.  After completing the companionway hatch, the epoxy bonding the backings to the underside of the poop deck had becoming tacky, or partially cured, and was ready to take the filler and patches.  I wetted the exposed core on the poop deck and the surrounding fiberglass - I also did this to the transom, though the transom was not cored. 


the photo below shows the stern light hole, backing cloth, with the surrounding fiberglass tapered and in the process of being wetted to accept the 1708 biaxial patches.


Just prior to wetting the surfaces with epoxy, I made a couple templates of the patches to be applied to both the haws opening and the stern light opening.  Using a small sheet of plastic, I traced two circles per opening that would be used to cut patches from the 1708 biaxial cloth. 


The photo above is of the transom; the photo below is of the poop deck.


And the patches for both openings.


Prior to placing the patches onto the openings, I mixed a small batch of epoxy and thickened it with colloidal silica and applied this to the holes themselves - filling the holes up to be fair with the shallowest grind of the taper.


The last step was to place the wetted 1708 cloth patches onto the tapered holes.


In the coming days, I will water wash, fill and fair these areas.  In reviewing the work as I was closing up shop for the day, I noticed that I may have to add another layer of 1708 biaxial to the transom hole (the former stern light).  Eventually, both areas will be brought to fair with their adjacent surfaces, primed and painted.  That would conclude the day's work.


Total Time:  6 Hrs.

Tuesday, July 7, 2015

Second Application of Fairing Filler

July 7, 2015

After yesterday's sanding of the first round of fairing filler (West System epoxy thickened with micro balloons), I noticed several areas that required further attention.  Inevitably, filling old fastener holes, cracks and general imperfections in the surface will require additional rounds of filling and then fairing. I wanted to take the opportunity this evening to spot fill those areas that needed additional work.  So, after cleaning the surfaces with solvent, I mixed a batch of epoxy and thickened it with the micro balloons - similar to West System's 410 Microlight.  Working around the boat, I spot applied to the low spots, bringing these areas generally fair with the surrounding surfaces.  In the coming days, and as time provides, I will water wash these areas and sand to fair.  After, I will determine if an additional round of filling and fairing is required.


I took no photos of this evening's work, but these photos taken after sanding the first round of fairing work show examples of low spots that required further attention.


Total Time: .5 Hrs.

Monday, July 6, 2015

Fairing the First Round of Filler

July 6, 2015

Having Alva Anne in the backyard makes it possible to grab an hour and a half on her as the mood strikes...it struck this evening.  The goal for the evening was to sand the the first round of fairing filler.  The fairing filler is West System epoxy thickened with micro balloons - an easy sanding filler used to fair surfaces as a general prep for painting.  The first order of business however was to water wash the cured epoxy in order to remove the amine blush.  A Scotch-Brite pad and water were the only tools required for this job, and I made my way around the boat in quick order. 


After I dried the surfaces, I grabbed the Porter Cable 5" random orbital sander and applied 80-grit paper.  Moving around the boat, from poop deck, cockpit, stern and rails, I took off the filler down to the fair with the surrounding surfaces.


Even though I took the filler down to fair with the adjacent surfaces, subsequent rounds would be required.  The photo below reveals low spots after I had passed the sander over this filled areas.  But I would apply this second round on another day.


The cockpit, showing the coamingboard and seat trim fastener holes filled and faired.  


Another shot of the cockpit, and the winch base fastener hole in the foreground.


In a couple of areas along the deck-to-hull joint the boat displayed more severe fiberglass damage, and required a bit more fill than the other areas.  This portion of the rail, along with a few other areas, will require an additional round, or two. 


Total Time: 1.5 Hrs.

Saturday, July 4, 2015

Continued Hardware Removal & Filling / Fairing

July 3, 2015


I began with removing the companionway sliding hatch, which required me first to remove a couple pieces of trim holding the hatch into its sliding channel.  With those two pieces removed, I lifted the hatch off of the top of the coach roof.  I gathered the fasteners which were in great shape in order to reuse in the installation of the newly milled brightwork.


I turned my attention to the hardware atop the coach roof on either side of the companionway sliding hatch.  On either side of the hatch was a working jib track and a cam cleat.  In addition, on the starboard side of the coach roof was a jam cleat.  It appeared that the deck hardware was oversized for the diameter lines typically used on this small boat, so further investigation and contemplation will be required prior to reinstalling this hardware.


The starboard side prior to and after removal, above and below.  The removal was straightforward: clamp a vise grip on the bolt securing to the underside of the coach roof and then back out the fastener with an impact driver.  I originally set out to back the fasteners out by hand, but actually destroyed one of my favorite antique screwdrivers attempting this.  I then quickly turned to the impact driver and removed the fasteners without issue.


The port side, sans jam cleat, prior to removal...


...and after removal.  Again, the vice grips and impact driver made quick work of the hardware.


Out on the foredeck, I used the vice grips and a large flathead screwdriver to remove the cleat shown below.  Reinstallation will include drilling out oversized holes, filling with epoxy, and then tapping for bronze machine screws.


A shot of the foredeck after removing the cleat.


The mast step was next, and showed a bit of resistance to removal.  There was significant corrosion between the stainless fasteners and the aluminum mast step.  Overall, I think the mast step is in good enough shape to reuse; however, since I have it off of the boat, I will investigate replacing this piece of hardware.


The mast step base showed some cracking of the gelcoat, but from what I could tell, appeared dry and without water damage to the coring below.


Before closing the shop for the day, I wanted to finish up filling the old toe rail fastener holes and applying a round of fairing filler to the recently filled fastener holes (cockpit, poop deck, stern, rub rails).  The first order of business when working with epoxy is to make sure the surface area is clean and prepped for work.  Whether it is reapplication of epoxy over recent work or new application onto existing structure, the surface must be "clean."  In my case, for this day's work, I had a bit of both scenarios - reapplication and new.


Reapplication may involve subsequent fairing rounds in which a small amount of epoxy thickened with a  fairing filler is squeegeed onto the surface and then sanded off until a fair surface is achieved. Prior to any subsequent application of epoxy, the prior application must be water washed and sanded. Water washing consists of using a Scotch-brite pad and water to remove the amine blush that forms on the surface of the epoxy as it cures.  Water washing is a quick rinse, scrub and drying of the surface so as to not contaminate the next application of epoxy.  I had a helper today for the water washing, and so Maggie made her way around the boat water washing the previous application of epoxy.


I did have some new work as well.  I had yet to fill the old fastener holes which held the toe rails in place.  My first order of business was to over drill the old holes to allow more surface area for the epoxy to bond with - producing a structurally superior result.  After I had over drilled the old holes, I moved on to cleaning the surface.  The cleaning simply involves vacuuming out all of the residual debris from drilling and wiping the surface with a solvent to remove any surface contaminate that may interfere with a good mechanical epoxy bond.  


With all surfaces clean, I proceeded to mix a small batch of "neat" epoxy - without any thickeners - and used it to wet out of the areas that I would be filling.  I then mixed a batch of epoxy and thickened it with with colloidal silica - a thickener used for structural work, and one I like to use as the first application when filling old fastener holes.  With the old toe rail fastener holes filled, I then mixed a few small batches of epoxy thickened with micro balloons - an easy-sanding fairing thickener.  Due to the heat, the epoxy was kicking, or curing, rather quickly, and necessitated me working in smaller batches.  


I made my way around the boat applying the first round of fairing filler to the recently filled fastener holes, as well as the just-filled toe rail holes.  The parting shot is of the stern where that mangled mess of stainless steel and aluminum once resided.


Total Time: 5.5 Hrs.

Toe Rails Scarf Jig

July 2nd and 3rd, 2015


I began laying out the scarf jig (sled) on Thursday evening.  The scarf joint is often used to increase the length of material required for a particular application, and is used routinely in boat building.  Fabricating lengthy toe rails for a sailboat often requires "gluing" up multiple lengths of material (teak, mahogany, etc.,), and this requires a strong joint, enduring joint that will take the curves of the boat.  The scarf joint is a diagonal cut between two boards that are then bonded together with wood glue, or better yet epoxy for the marine environment.  The rule for the length of scarf, or diagonal cut, is a ratio of either 8:1 or 12:1.  I choose the 12:1 ratio, so that means for every 1 inch of thickness in material, the scarf joint calls for 12 inches in length.  The toe rails for Alva Anne will be right around an inch to an inch and a quarter, so the the 12:1 ratio will be used.


I decide to make a sled jig to run over the table saw.  I started with a rectangular piece of hardwood ply, and installed two runners along the underside.  These runners will slot into the channels on the surface of the table saw, and will serve to keep the board aligned, consistently, as it progresses into the cut area.  I then laid out my cutting, or scarfing angle, onto the board.  Since I needed a 12:1 scarf, I would need an angle that produce this 12" length of cut as the sled ran over the saw blade.  The simplest way to produce this is to lay out a line on the board 12" in length, at one end of the line make a point 1" perpendicular to the original line, finally, connect the point and the opposite end of the original 12" line.  This produces a 12" span over the 1" thick piece of material.  At first thought, my plan was to lay out this cutting angle on the edge of the sled, and so I did install a board on the edge of the sled to use as a clamp board.  But after more thought, I decided to install the clamp board toward the center of the sled, making it much easier to cut, and would also produce more consistency in the cutting.  


Making the decision to move the clamping board to the center, I slid the measurements and angles of the edge board over toward the center line.  After replicating the cutting angle with a pencil line, I secured the new clamping board with screws.  The final touch was to secure a couple push blocks onto the surface of the sled - at a safe distance from the blade.


I tested the sled with a couple similar-sized boards, and was very happy with the results.  The scarf jig for the toe rails is now ready for the mahogany blanks!  Back to preparing the boat for paint...


Total Time: 2 Hrs.